
To create a transport for your High-speed Data Transmission service click Manage Services from the top menu and choose Add Transport.
The Add New Transport page appears.
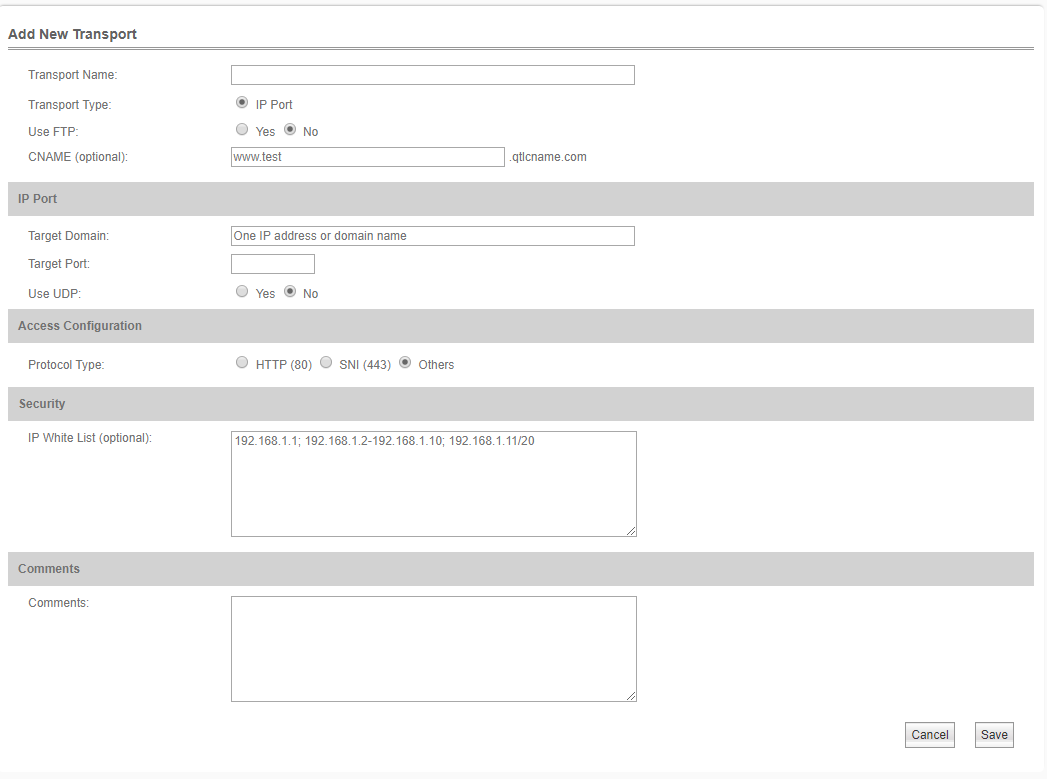
- Enter a name for your transport. The name is simply used to help you easily identify the transport if you have multiple ones.
- Choose whether FTP is used
- Customize the CNAME if you wish. If you leave the CNAME field empty, a default one will be generated for you.
- To configure an IP Port transport, enter you target domain, target port, and whether to use UDP. These settings represent the server that QUANTIL's servers connect to in order to transfer data.
- Choose the protocol type your users will use to access the transport. If you wish to use the HTTP standard port 80, then choose "HTTP (80)". If you wish to use HTTPS over the standard port 443, choose "SNI (443)". For all other cases, choose "Others". If you choose "HTTP (80)" or "SNI (443)", an Access Domains field will appear. You must then enter one or more comma separated domains that your users will use to access the transport. The "*." characters can be used to indicate subdomains as in the following example: aaa.domain1.com,*.domain2.com. In this case, users of the transport must access aaa.domain1.com or a subdomain of domain2.com. The asterisk character cannot appear in any other position. It is your responsibility to configure your access domains with the CNAME associated with the transport. Please note that if you create the transport initially using "HTTP (80)", you will not be able to switch it to "SNI (443)" later. Similarly, if you configure it to "SNI (443)" , you will not be able to change it to "HTTP (80)". If you have to make such a change, you will have to delete and recreate the transport as desired.
- For security, you can limit who can use your transport to only allow connections from specific IP addresses. Enter one or more IP addresses separated by semicolons in the IP White List field. Besides individual IP addresses, you can enter a range such as 192.168.0.1-192.168.0.199. You can also use CIDR notation, for instance, 192.168.0.1/24.
- The optional comments field lets you enter notes associated with the new transport.
- Click Save to create the transport.
Your new transport will appear in your list of transports. Click the ID of the new transport to see its settings. For high speed data transfers, connect to the transport's CNAME using the assigned access port instead of your target domain and target port.
For example, if you are trying to accelerate an FTP service at ftpserver.yourcompany.com, enter that as the Target Domain. Suppose your assigned CNAME is ftpserver.yourname.com.qtlcname.com, and your assigned access port is 1234. To transfer files using QUANTIL, you would open an FTP connection to ftpserver.yourname.qtlcname.com through port 1234. QUANTIL would transfer data through its network to the target domain, ftpserver.yourcompany.com.
If you have opted to use the standard port 80 for HTTP or 443 for SNI and filled out the Access Domains field, you should have configured your access domains with the assigned CNAME, so your users can connect to the transport using one of them. For example, suppose you are using HTTP (80), your access domain is mycompany.com, and the assigned CNAME is mycompany.qtlcname.com. Then mycompany.com's CNAME must be configured as mycompany.qtlcname.com, and your users will be able to visit http://mycompany.com/.